Sunday, September 30, 2012

An EPIC post on how to accessorize a LBD...

Hi Everyone,

I apologize for the gap in posts.  It's been a hectic week.  But I've been thinking about this post throughout the entirety of my absence, so it will be EPIC.  Promise.

Several of my readers, including my good friend Ashely, have requested that I post about the basics of accessorizing:  who, what, when, where, why, how, and OMG that's so scary.  So, since I must return with a vengeance...game on!

Ok.  Accessories...accessories.  Where to start?  I'll be honest, I wrote different versions of this post six times before realizing that there is no way I'll adequately begin to explain every detail of when each type of accessory is appropriate.  It's like trying to cram your life story into a 2 minute allotted speaking time.  Not.Gunna.Happen.

Today, I'll focus on my GENERAL rules of accessorizing a basic outfit.  We'll start with an outfit that can be accessorized a MILLION ways...the Little Black Dress (LBD).


Once you've selected what the basic piece of your outfit is, you need to take several things into account:

1.  Where are you going?  What is the tone of this place?
2.  Will this outfit need to transition from day to night?
3.  What time of year is it?
4.  Is there even a slight chance you will need to do a lot of walking?
5.  What is the weather like today?

Let's say you're going to work in a relatively non-stuffy office environment.  After work, you're meeting up with some girlfriends for drinks and you won't have time to go home and change first.  It's Fall, still warm enough to go without a jacket and it's a gorgeous day outside.  You drive, but may want to run out on your lunch break and you still are nursing your blisters from your last fight with your hooker heels.  So, how do you accessorize this look?

Step ONE:  Since you have as basic a canvas as you can possibly work with, decide on ONE statement accessory.

In this case, I'd make it shoes.  A gorgeous pair of animal print flats can really put life into this dress in a way that's both appropriate for the workplace AND adorable for going out later on.  (You could also do a brightly colored shoe or another design...but since I've been lusting after these particular shoes for a while now, I'm using these to make my point.  Don't judge me.)

Step 2:  You have the basic outfit AND statement accessory down.  Decide on whether or not there should be any more clothing added.

In this situation, you're going to work.  And it's Fall.  Add a cardigan.  You can always take it off when you go out later if you're super about showing your arms in the Fall.  I chose a simple burgundy cardigan, which is a great color for the season and will look hot with the animal print.


Step 3:  Decide on jewelry.

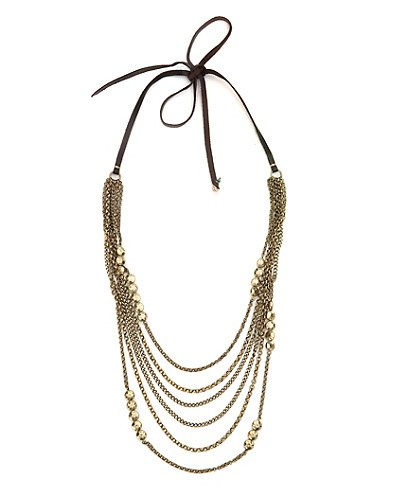
I am a big believer in not being overdone.  Therefore, as a general rule, I will NEVER combine a large earring with a large necklace.  Pick ONE.  Another general rule is that chandelier, or other very large earrings, generally do not have a place at work.  In this instance, I'd wear a simple gold stud earring and a large necklace, such as this:

You could also even add a delicate, but fun, ring...such as this:

Step 4:  To belt...or not to belt?

With this look, you could absolutely wear a belt over the cardigan to cinch your waist and pull the outfit together.  For this look, I'd wear a skinny black belt, if I were to wear a belt.  But truth be told, that's just not my scene.  I can never pull it off without fearing that I look like a tool.

Step 5:  Assess.  Are you done?

This is a perfectly acceptable complete look.  But since I want to push it a little bit further, and since I'm COMPLETELY obsessed with hair accessories, we're going to add a headband to make this look a little bit more fun.


So, the point.  When you're working with an outfit that is simple and can be accessorized a million ways from Sunday.  Pick ONE statement piece.  It can be a loud shoe, a big necklace, a fascinator, a colorful scarf, really anything.  Then plan the rest of your accessories to go with that.  Each piece should have personality, but refinement.  You can't have too much "loud" going on in one outfit.  By that, I mean that you don't want to wear a big obnoxious necklace, a loud shoe, a colorful scarf, a loud bag, a fascinator, 6 bangles, a watch, and some lacy thigh highs in the same outfit.  Sure, Lady Gaga gets away with things like that, but you won't.  I promise.

In my next accessories post, I'll let you all know what happens when you start with a "loud" outfit.
 

Monday, September 24, 2012

The Best Concealer Ever Made

Hi Everyone,

Today I was planning on doing a makeup look and OOTD, but my awful hair day and bloating convinced me that I should not encourage others to aspire to look like me.

So, since I have vowed to myself (and others) not to quit blogging, I decided to do a product review instead.  After racking my brain for what product I truly could NOT live without, I came up with my all-time favorite concealer.

Let me preface all of this with my dirty little secret.  I have AWFUL dark circles.  AWFUL.  Think, constantly looks like I was beaten by angry gang members, AWFUL.  It's the one part of my face that I'm really self-conscious about.  Because of this lovely trait, I've spent the entirety of my adolescent and adult life looking for a concealer that would prevent me from looking like a Yankee fan in Fenway park after dark.

Well, 6 months ago, I FINALLY found it.  I won't lie or sugarcoat this.  In fact, as you come to know me better, you'll learn that I'm just not good at lying or sugarcoating.  I'm honest to a fault.  Anyway, as I was saying, I won't sugar coat it...the price tag of my winning concealer could choke a small horse.  It's a FORTUNE...but it's worth it.

So, what is this miracle concealer?  It's the Cle de Peau concealer stick.  The color I use is Ochre.  A tube lasts you about 8-10 months and will set you back $70.  Yes, I know.  Holy guacamole, that's EXPENSIVE!  Well, I know.  I wish it were cheaper too.  But I promise you, it's worth it.

Want some proof?

Here is a picture of my face without concealer:


And here's a picture of my face WITH concealer.  Yes, they were taken on different dates, but LOOK at the difference in the under eye/discoloration areas!


So yeah.  This is why I call it a facelift in a tube.  If you have severe dark circles or discoloration, THIS is the concealer for you.

Sunday, September 23, 2012

Today's Look: Makeup AND OOTD

Hi Everyone!

I'm so excited to be posting my very first post about makeup and my Outfit of the Day (OOTD)!

So for today, I wanted to go with a bold green eye look for Fall.  Also, I wanted to look extra hot because it was my husband's first day off all week and I wanted him to do a double take.  :)

So, here is my face pre-makeup:


And here is the finished look:


For this look, I used the following products:

-Makeup Forever HD Foundation in 125
-Cle de Peau concealer in Ochre
-Maybelline Instant Age Rewind Finishing Powder in Creamy Natural
-Urban Decay Primer Potion in Original
-Urban Decay 24/7 eyeliner in Perversion
-Loreal Lineur Intense liquid eyeliner in Carbon Black
-Dior Diorshow Lash Plumping Serum
-Givenchy Noir Couture 4 in 1 mascara in Black Satin
-Smashbox The Master Class Palette eyeshadows in Serpent, Butter, Chestnut, and Sumatra.
-Smashbox The Master Class Palette cream eyeshadow in Ivy.
-Smashbox The Master Class Palette blush in Warm Apricot
-Smashbox The Master Class Palette highlight in Lens
-Smashbox The Master Class Palette lip gloss in Buff

So...how do you use that absurd amount of products to create this look?  Follow these simple steps:

1.  Apply foundation, concealer, and finishing powder as you normally would.
2.  Apply UDPP on eyelids.  Wait for it to dry.
3.  Apply SMCP cream shadow in Ivy liberally ALL over your eyelid and up into the crease with your finger.  That's right, this should feel reminiscent of preschool finger painting class!
4.  Take a fluffy and wide blending brush, think MAC 227 brush, and blend out the edges of the cream shadow.  Be sure to blend DOWN, not UP into your browbone.
5.  Take a shading brush and pat SMCP Serpent eyeshadow all over your lower lid, tapering it LIGHTLY up to the crease.  Be sure to concentrate the application near your lash line.
6.  Take a short shader brush, think MAC 214, and connect the SMCP Serpent eyeshadow to your lower lash line.  Less is more here.  You don't want to look like a raccoon.
7.  Blend the edges of the Serpent eyeshadow you've just applied to make it look less harsh.
8.  Take a shadow brush and apply SMCP eyeshadow in Butter under your brow bone and in the pocket near your tear duct as a highlight shade.
9.  Take a tapered blending blush, like a MAC 224, and dip the tip ONLY in the SMCP eyeshadow in Chestnut.
10.  Lightly trace the edges of the Serpent shadow with the Chestnut shadow and blend.
11.  Repeat step 6 with the Chestnut shade.
12.  Apply some SMCP eyeshadow in Sumatra on the outside corner of each eye, to help deepen the green color of the Serpent.
13.  Line your water line and tightline your top lash line with a black kohl pencil. 
14.  Line your upper lash line with a black liquid liner.  Create a slight winged effect. 
15.  Apply mascara.  If you want a very defined look, I HIGHLY recommend the Diorshow Lash Plumping Serum.  It's miraculous.
16.  Apply SMPC blush in Warm Peach.
17.  Apply SMPC highlight in Lens to the very top of your cheekbones.
18.  Apply SMPC gloss in Buff.

YOU'RE DONE!

And, to finish up the post, here's my OOTD.


Dress:  LC Lauren Conrad
Cardigan:  Express
Boots:  DSW
Bag:  Coach

My First Post!

Hi Everyone!

I suppose the best way to start this blog is to tell you all a little bit about myself.  My name is Cathy and I'm a 24 year old newlywed living in Boston, MA.  I am completely obsessed with all things fashion and beauty.  I enjoy shopping, weekend trips, kickboxing, and snuggling with my husband, Jeremy.

In terms of both fashion and beauty, I am inspired by things that are classic, with a "twist".  I don't tend to gravitate toward anything too expected, or conversely, too "out there".  I believe in shopping on a reasonable budget, so while there are many brands that I LOVE, I will only splurge occasionally.

I want all of my readers to read things THEY want to learn about, so please let me know what makeup or fashion things you would like to see me blog about.  I'll do my best to get to each request as soon as possible.

I think that's everything for now.  I'm so excited to start blogging!

XOXO,

Cathy