I hope you're all having a lovely Wednesday. Today I've decided to go back to beauty basics. I'm going to define some beauty/makeup terms, explain the different kinds of makeup brushes, and give you some other basic knowledge!
First up: My Beauty Glossary
- Buildable: When I say that something is buildable, I mean that it gives sufficient color/coverage with one layer of product, but that adding more layers of product will successfully intensify the color/coverage of the product.
- Cheekbone: The part of a person's bone structure below her eyes that form the prominence of her cheeks. This is where you apply blush.
- Contouring: Using makeup to create dark shadows and give the appearance of narrowing or receding a feature.
- Corrector: Commonly confused with concealer, corrector is a beauty product used to correct a discoloration. Concealer is used to brighten up an area (like dark circles), but CORRECTOR is used to cancel out a discoloration (like redness). I swear, they're 2 different products!
- Cupid's Bow: The tips of your upper lip that form two peaks.
- Expiration Date: I thought I'd throw this in here. All makeup has an expiration date. You can find it on the packaging. It will look something like this. (The number corresponds to months you have prior to expiration.)
- Fall out: "Fall out" refers to the uber annoying situation when excess product (usually you say this regarding eyeshadow) falls off of the designated area, so you have makeup "falling out" of place to other areas of your face.
- Glitter: Relatively large, chunky bits of sparkle in makeup
- Glossy: Shiny or lustrous
- Highlight: Using light shades of makeup to draw attention to a specific feature
- Holy Grail (HG): I will use this term in reference to a beauty product that I absolutely love, use regularly, and is my all-time favorite
- Matte: A "matte" makeup product is one that does not have any shimmer, gloss, shine, glitter, etc. It is simply the color without any extras.
- Payoff: This refers to how many layers of a product you'll have to use in order to get a product to show up. The fewer layers you need to make a product show up, the better the payoff. (This term usually refers to eyeshadow.)
- Some eyeshadows have AWFUL payoff. You can keep trying and trying to get them to show up, but they just suck!
- Pigmented: Refers to how well the color shows up. Highly pigmented products mean that the color shows up really well.
- Primer: A liquid, gel, or cream used underneath makeup with the purpose of enhancing the makeup's color and staying power.
- Setting spray: Sort of like hairspray for your makeup. Spray it on your face after you're done applying your makeup and it will help remove surface oils to keep your makeup in tip top shape all day long.
- Shimmer: Shiny or sparkly, but not containing large chunks of sparkle, like glitter
- Swatch: To test a makeup product, by smearing or applying it onto your hand, arm, etc.
- Tightlining: Accentuating your lash line by lining the space between the eyelashes from underneath, instead of lining on your actual eyelid.
- Waterline: The area of your eye, on your lower lid, where your tear ducts are. It is usually moist, and can therefore be tricky to apply eye liner to.

Ok, now that we know our beauty terms, let's talk a little bit about makeup brushes. You may think they can be overpriced, or that it's a pain to have to buy so many different types of brushes just to do your makeup. I don't disagree with you, but in order to get quality results, you need quality tools.
In general, there are two types of brush types: natural fiber and synthetic. Each certainly has its pros and cons. Natural fibers tend to be softer. They are porous and absorb some of the product for more natural looks. These work great with powders, like finishing powder and eyeshadow. Synthetic fibers can be cheaper and can create more pigmented looks due to less product absorption. Synthetic fibers are optimal when you're using the brush to apply gel liners or lip products.
One major rule I have before I start the brush introductions is: the recommended uses I list for the brushes below are generalizations. All rules are meant to be broken. Many brushes can be used AMAZINGLY for unorthodox purposes. EXPERIMENT with your brushes!
Brush Type #1: Large, Fluffy
A brush like this is fantastic for applying finishing/setting powder to your face, over your foundation. I have also used this type of brush to apply highligher, although it is not optimal for that.

Brush Type #2: Large Angled Contour
I use this brush daily to apply and blend in my liquid foundation. A brush like this can also be good for contouring, finishing/setting powder, highlighting, or blush, although isn't optimal for those purposes.

Brush Type #3: Stippling Brush
This brush is great for applying finishing powder or highlighting.

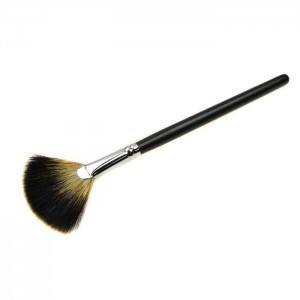
This brush is great for applying bronzer, blush, highlighter in a very light, natural looking way.
This brush is great for sweeping through mascara clumps and brushing your eyebrows into place.

Optimal for applying brow powder. Can also be used for shadow liners, or blending pencil/gel liners.

If I had to get by with one brush, this would be it. It's got gorgeous, dome shaped bristles that have a moderate density to them. It's ideal for blending eyeshadow any which way necessary. I also use this brush daily to blend in my under eye and blemish concealer for a natural finish. Can also be used to apply shadow if you are going for a very light, whispy shadow look. In a pinch, I have also squeezed the bristles and used it as a brow powder brush. Moral of the story is, this brush is a workhorse, and its uses extend only to your own level of creativity.

Brush Type #8: Large Fluff
This brush's short, wide, and reasonably dense bristles make it ideal for blending eyeshadow on a specific part of your lid. (Example, you want to blend the shadow near your lower lid, but don't want it to travel to your crease or brow bone...this is your brush.)

Brush Types #9 & 10: Small Angle and Flat Definer
Both of these brushes are great for applying shadow liner & blending liner. The angle may make winged liner slightly easier.


Brush Type 11: Eyeliner
Self explanatory. This brush is for applying liner, particularly gel liner. Due to the tiny nature of this brush, it's not the best blender.

Angled or not, shading brushes are your eyeshadow brushes. I don't recommend blending with them, but they're perfect for direct, hit it & quit it application of a color.

Due to the pointy, and densely packed bristles, this brush is great for applying a highlight on your inner corner of the eye. It's also great for applying a deep colored eyeshadow in a small area (like when creating a smoky eye.)

This is pretty self explanatory. This brush is used to apply lip product. Just remember that in terms of lip brushes, synthetic fibers are usually better.

Brush Type #15: Short Shader
This brush is crucial to have. You want to apply shadow to your lower lashline to make your look cohesive? This is your brush. You can also use this brush to blend liners or even create a course & gritty shadow/liner look.

Brush not pictured here? No problem! Figure out how to use a brush all on your own by asking yourself a couple of questions.
- What is the general size of the brush? Obviously, an enormous fluffy brush isn't used to apply eyeliner and a small angled brush won't be applying your blush.
- How dense are the bristles? Generally, dense bristles mean you want to apply a LOT of product to the area you'll be using the brush in and focusing it there. That's why liner brushes are small and dense and powder brushes are huge and more dispersed. Brushes that look like they could be for shadow but have more dispersed bristles could make excellent blending brushes.
- And when in doubt, EXPERIMENT! For many brushes, there really is NO wrong way to use them!
This post is dragging on forever, but I have to say it! Try to wash your brushes once a week ladies. If you use dirty brushes, you are making yourself susceptible to potentially harmful bacteria and breakouts. And make sure you dry your brushes bristle side down, or you can damage the bristles!
And with that, I bid you goodnight!
XOXO.
Wow, learned a great deal from this post. I have a sephora set of brushes that I was just experimenting with, as you put it, but now the guessing work is over. :) Much appreciated!
ReplyDeleteSue